Normally, Windows Virtual PC (VPC) is required to install and run Windows XP Mode (XPM). For VMware Workstation or VMware Player users, there is no reason not to install VPC again just to use XPM, instead of just using more advanced VMware virtualization solution.
From VMware Workstation 7 and VMWare Player 3, the VMware products are now Windows XP Mode compatible, where users of VMware Workstation or VMware Player can import a Windows XP Mode virtual machine, and run the virtual machine full activated, without the need to enter a Windows XP license serial number or product key to activate Windows XP Mode. Windows XP Mode is pre-activated by default, but the activation is normally lost when the virtual machine is ported to other platform.
By running Windows XP Mode on VMware, the virtual machine can take advantage of more than one CPU processor, render high-end graphics, integrate seamlessly with Unity, transfer files easily with drag and drop, and use shared folders. Best of all, VMware can also run concurrently with Windows XP Mode.
Here’s how to import and run Windows XP Mode on VMware Player or VMware Workstation:
- Download and install Windows XP Mode.
Tip: Windows Virtual PC is not required, if you not plan to use it.
- Run VMware Player or VMware Workstation.
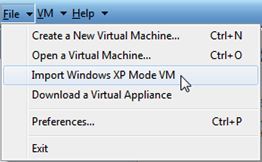
- Click on File drop down menu, and select Import Windows XP Mode VM.

- VMware will automatically import and reconfigure Windows XP Mode virtual machine to work with VMware virtualization engine, with a dialog box with progress status bar. Once process is completed, a new virtual machine named Windows XP Mode will appear in VMware.
- Select the Windows XP Mode and click Play Virtual Machine to run the XP Mode.

Note: If the Windows XP Mode has never been started before, user will need to complete the initial setup.
Tip 1: If the Windows XP Mode is not activated after imported into VMware, check the Windows Xp Mode.vmx configuration file, and ensure that an entry called xpmode.enabled has the “True” value, i.e. xpmode.enabled = “TRUE”.
Tip 2: VMware is adhering to Microsoft’s requirement, which means Windows XP Mode in VMware will only works in premium editions of Windows 7, including Ultimate, Professional and Enterprise. In Windows 7 Home Basic, Windows 7 Home Premium, Windows Vista, Windows XP or Linux, the XP Mode is disabled, and user won’t even see the Import Windows XP Mode VM option.
Tip 3: Windows XP Mode must be installed in order for the Import Windows XP Mode option to be available.
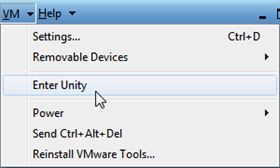
Tip 4: To seamlessly integrate Windows XP Mode with host computer, install the VMware Tools. Once VMware Tools is installed, click on VM drop down menu on the Windows XP Mode VM window, and click on Enter Unity to enable seamless applications publishing from Windows XP Mode to Windows 7 host. A extra Windows XP Mode Start Menu to access programs in the XP Mode VM will be displayed above the Start button when user mouse hovers over Start button.

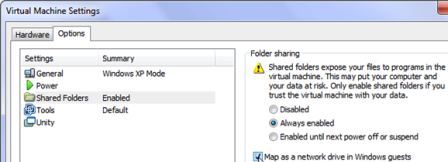
Tip 5: By default, all application software in Windows XP Mode will access, open and save to file location inside the virtual machine. To allow Windows XP Mode to open or save to folders in Windows 7 host computer, go to VM menu and select Settings. Go to Options tab, and select Shared Folders. Select the radio button for Always enabled, and tick the check box for Map as a network drive in Windows guests. Then, click on Add button and follow the Add Shared Folder wizard to share folder.
